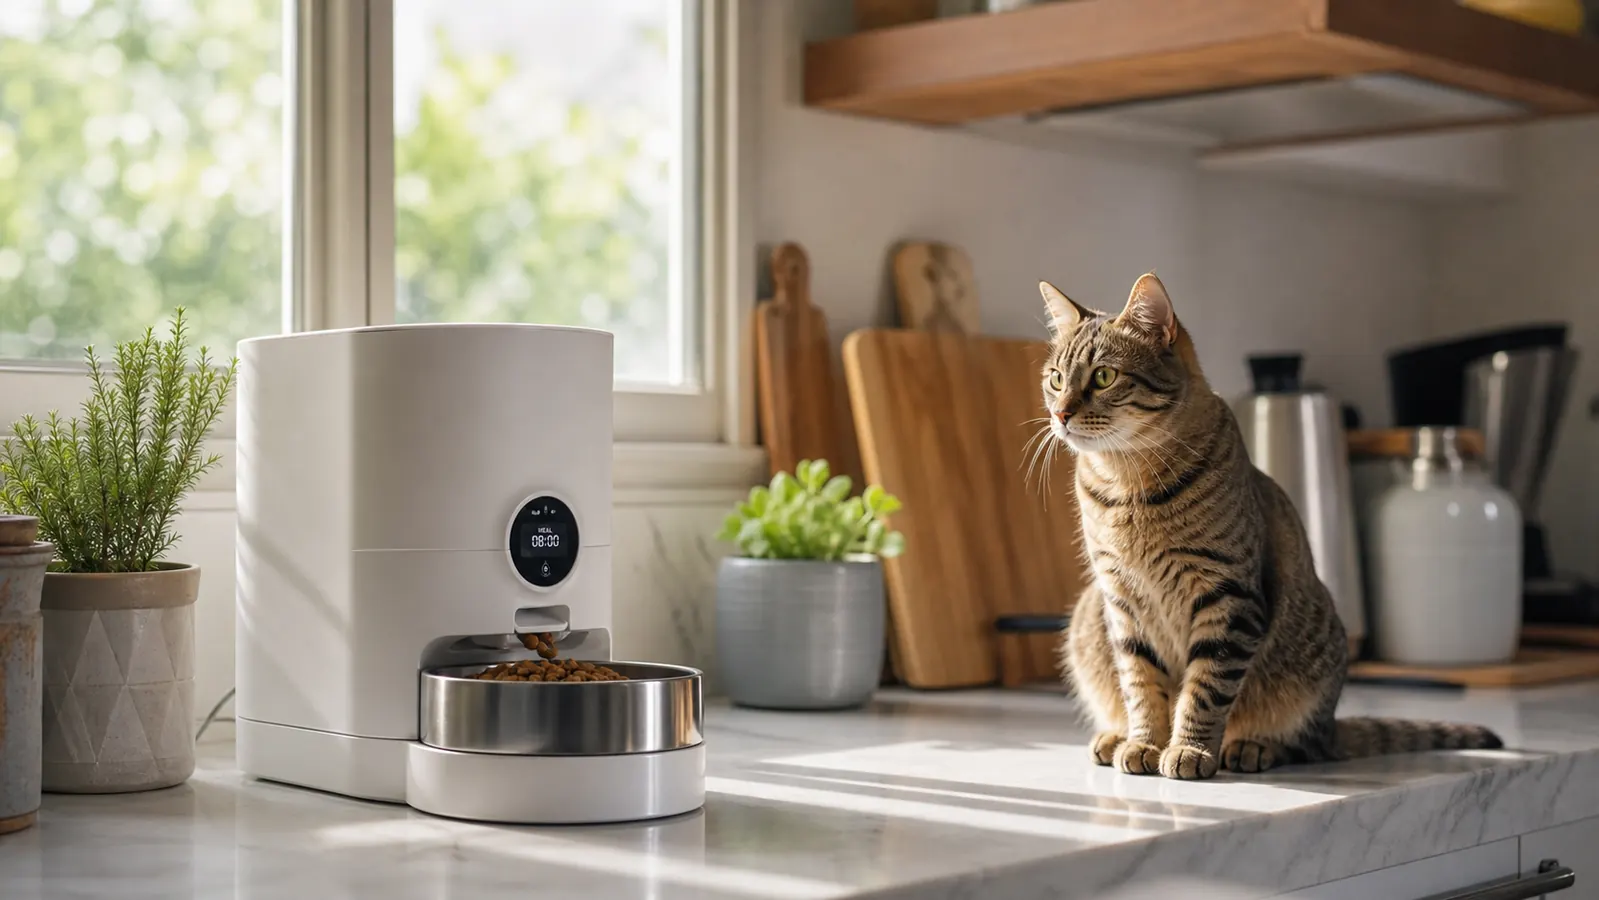
I have two cats and a beagle. For years the morning routine meant me stumbling to the kitchen at 5:45 AM because Biscuit would not stop meowing. Then I tried three different automatic feeders. The first two got returned. The third one -- a VOLUAS 4L timed feeder -- is still sitting on my counter six months later, running without any issues. The difference between a feeder that actually works and one that jams every third day is almost entirely in how you set it up. If you rush the initial configuration, the feeder will dispense the wrong amount, miss meals, or confuse your pet. Do it right once and you can pretty much stop thinking about it.
This guide walks through every step from unboxing to recording the voice message. I cover cats and dogs because the VOLUAS works for both, but I will point out where the setup choice differs depending on your animal. Cats eating from gravity feeders tend to graze and often need portion discipline more than dogs do. Dogs, especially food-motivated breeds, need the dispense size calibrated carefully so they are not done in 30 seconds and back at the bowl looking for more. Both issues are solvable at setup time if you know what to adjust.
Want to skip the trial-and-error on feeders? The VOLUAS is the one I kept.
Programmable for up to 4 meals a day, holds 4 liters of dry food, comes with a 10-second voice recorder, and works on both batteries and USB power. Rated 4.4 stars across 12,000+ reviews.
Amazon Check Today's Price on Amazon →Step 1: Pick the Right Location Before You Touch a Single Button
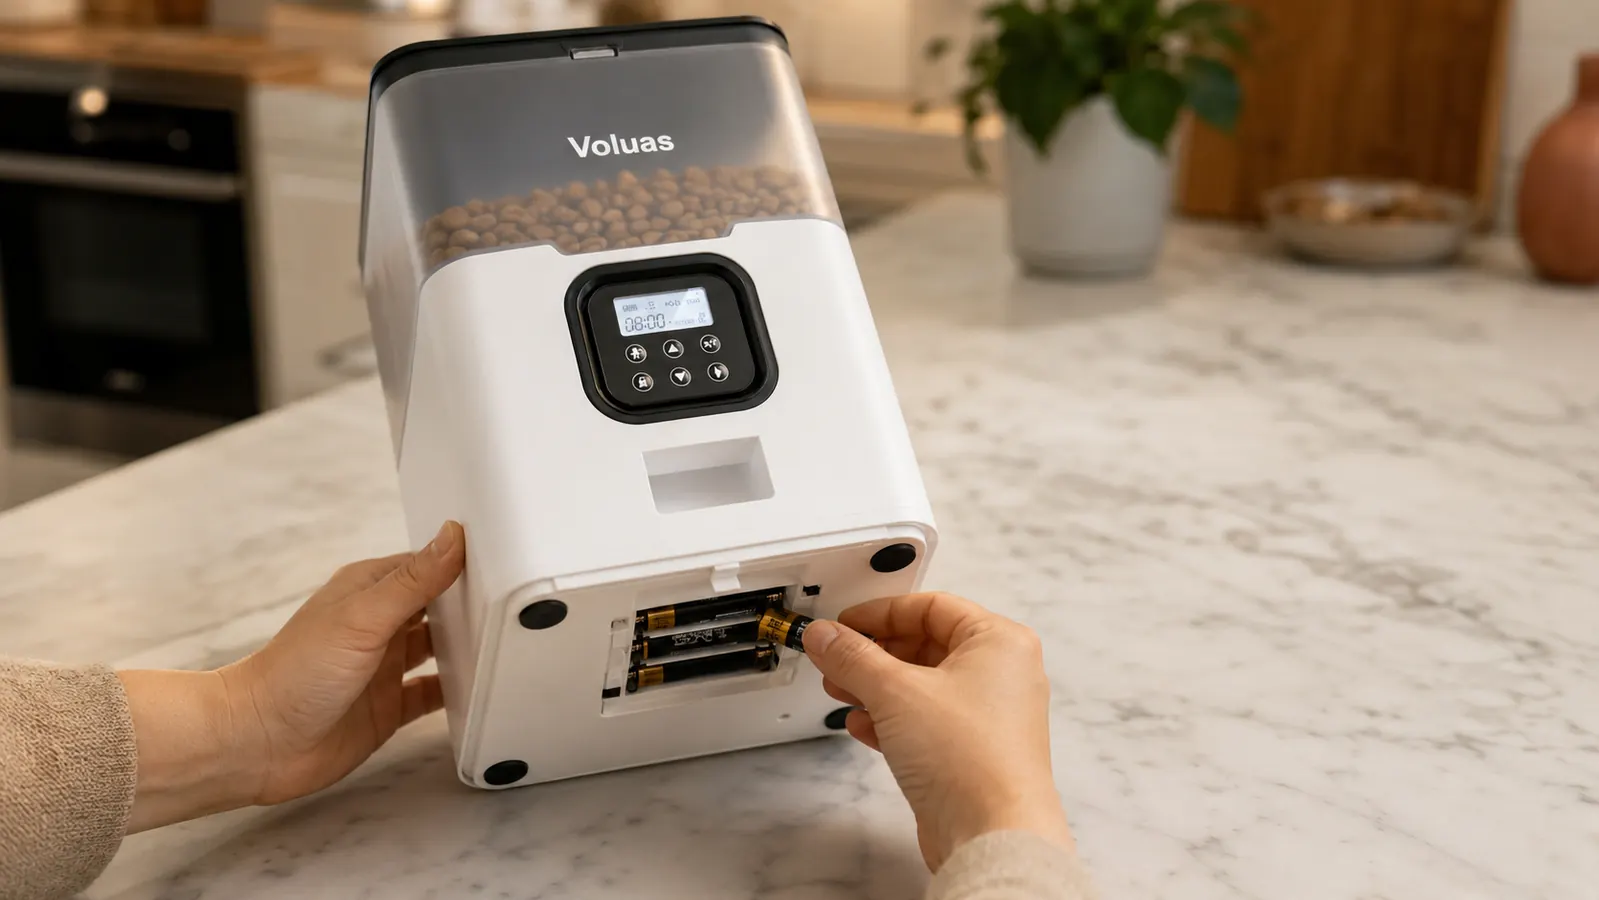
Location sounds obvious but people get this wrong constantly. Set the feeder somewhere flat, hard, and away from food and water bowls that your pet could knock into it. I keep mine on the kitchen tile, not near the water fountain my cats use. If your dog is a sloppy drinker, that moisture can get into the motor tray over time. The feeder works on a 5V USB-C cable or four D-cell batteries. I use the USB cable plugged into a kitchen outlet with a battery set installed as backup. If the power blips, the batteries keep the schedule running and the time does not reset. Set that dual power configuration first before you program anything, because on most automatic feeders, including this one, losing power mid-program wipes the meal schedule.
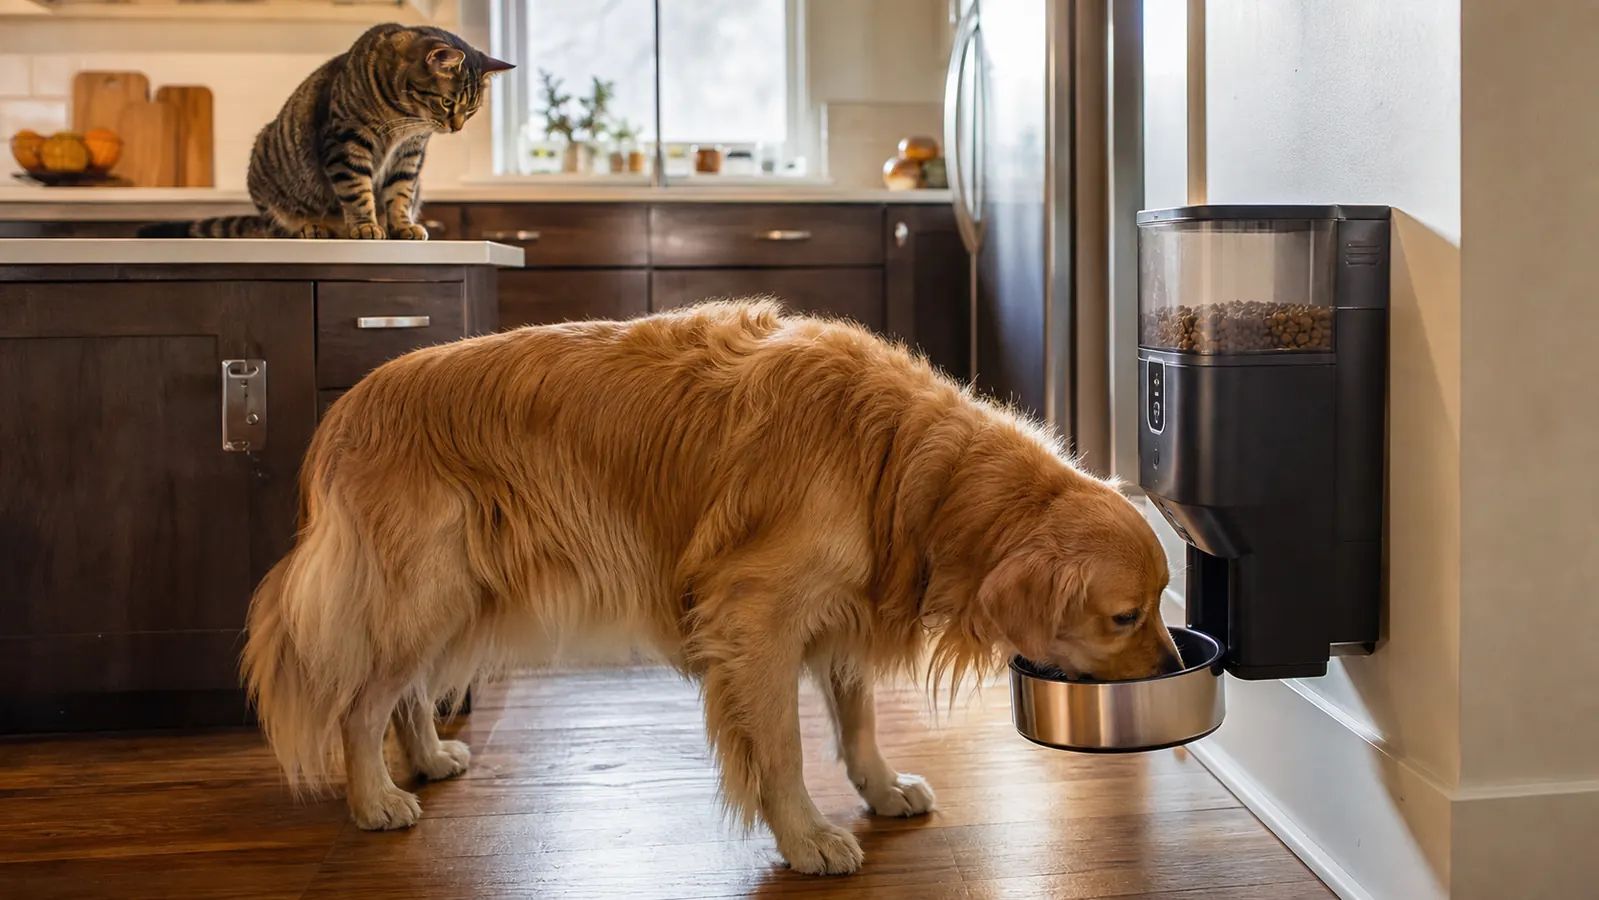
For cats specifically, consider height. Cats eat more comfortably when the bowl is slightly elevated. The VOLUAS sits at standard counter height, so I set it on a low shelf unit that puts the bowl about 4 inches off the floor. My vet mentioned that raised feeding reduces air-gulping, which matters if your cat vomits after meals. For most dogs, ground level is correct -- raised bowls are sometimes recommended for giant breeds, but for medium or small dogs, just keep the feeder on the floor in a corner where it will not slide when the dog nudges it.
Step 2: Set the Clock Accurately -- This Drives Everything Else
Press and hold the Clock button until the hour digits blink. Use the left and right arrow keys to set the correct hour, then press Clock again to move to minutes. Set the exact current time. If you are 10 minutes off because you rushed, every scheduled meal will be 10 minutes off. That sounds small, but if your cat starts yelling for food at 5:45 AM and the feeder is set for 5:55, you will have a loud 10-minute window every morning. Get the clock right on the first try.
The VOLUAS uses a 24-hour clock internally, so if you want a 7:00 PM feeding make sure you are entering 19:00, not 7:00. This trips people up. If you set an evening meal at 7:00 instead of 19:00, the feeder will dispense a meal at 7:00 AM and then nothing in the evening. I made this exact mistake the first day and my cats got two breakfasts and a dinner that never came. Check the display carefully: AM and PM are shown, so you can confirm you entered the right time period before you save.
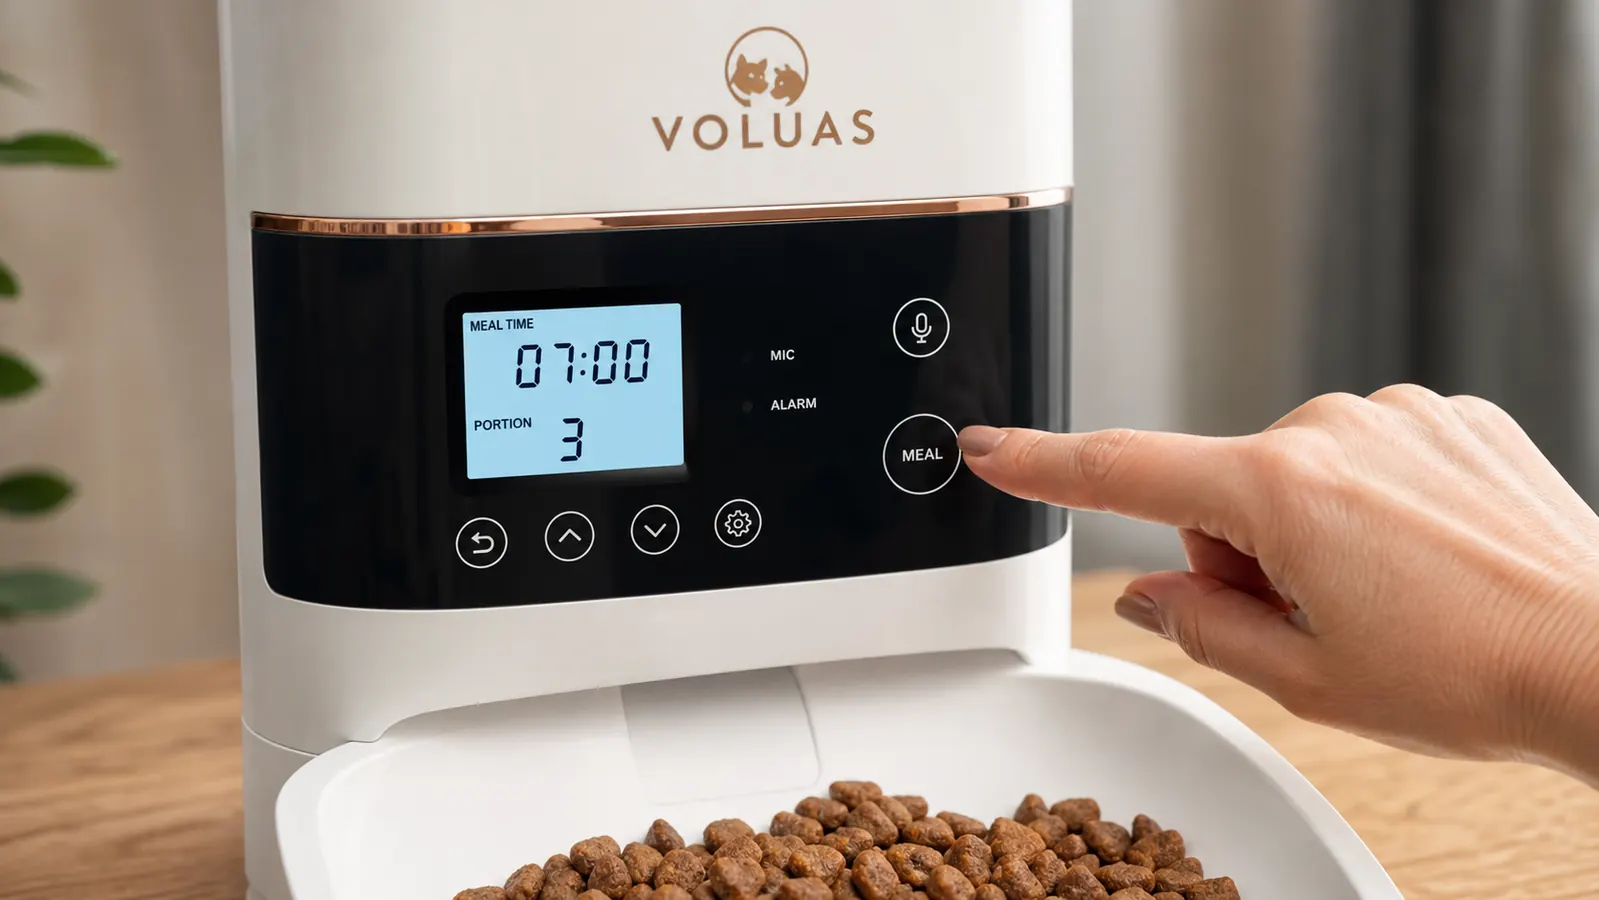
Step 3: Program Meal Times and Portion Sizes for Your Specific Pet
The VOLUAS allows up to four meals per day. Press the Meal button to enter programming mode for Meal 1. Set the hour and minute for that feeding time, then set the portion size. Portion size is set with a dial or button depending on firmware version -- on mine it is a numbered setting from 1 to 12. Each increment is roughly 10-12 grams of standard dry kibble, so setting 3 dispenses about 30-35 grams. Weigh your pet's current daily portion on a kitchen scale, divide by however many meals you are programming, and match that to the closest increment. Do not eyeball this.
For cats: most adult cats eating a weight-maintenance diet need 50-70 grams of dry food per day. If you are doing three meals, that is roughly 18-23 grams per meal, which lands around setting 2 on this feeder. For a cat on a diet -- like my 12-pound tabby Mochi who was supposed to be 10 pounds -- I run it at setting 1 three times per day and add one wet-food meal I serve by hand in the evening. For dogs: a 30-pound dog eating 150 grams of kibble daily across two meals needs about 75 grams per meal, which is setting 6-7 on the VOLUAS. Again, weigh it first rather than trusting the increment numbers without verification. Run a test dispense after programming and weigh what comes out.
Repeat the meal programming process for each feeding you want -- Meal 2, Meal 3, Meal 4 if needed. You do not have to use all four slots. Most cats and small dogs do well on two or three meals. One meal per day is not recommended because it leads to gulping and hunger-driven behavior between feedings. Two meals minimum, three for pets who tend to beg or have blood sugar regulation issues.
Step 4: Record the Voice Message So Your Pet Actually Comes to the Feeder
The VOLUAS has a 10-second voice recorder built in. You hold the record button, say your message, and release. The feeder plays it back through a small speaker each time a meal dispenses. This feature sounds gimmicky until you realize that pets learn to associate your voice with food very quickly. Within a week, my cats went from ignoring the feeder entirely to running to it when they heard the recording. My beagle took two days. The voice message essentially trains your pet that the feeder click equals food -- it is the same principle as a clicker, just using your voice instead.
Record something you actually say at feeding time. I say 'Biscuit, breakfast!' in the same tone I use when I actually put down his bowl. Avoid high-pitched excited tones if your dog is food-reactive and tends to jump or spin. Keep it calm and consistent. If you have multiple pets with different names, record a phrase that covers both, like 'Time to eat, everybody.' The recording quality on the VOLUAS speaker is decent but not loud -- it works in a quiet kitchen, but if you have a noisy house or a dog who sleeps in another room, test whether they can actually hear it from where they sleep. If not, you may need to move the feeder closer to where your pet rests during the day.
Step 5: Run a Test Cycle and Watch What Happens
Before you load the feeder with a full supply of food, run a manual test dispense. Press the Manual button once. The auger will rotate and drop a portion into the bowl. Watch to confirm food is actually reaching the bowl and not jamming partway down the chute. Jams are more common with oversized kibble (anything above about 1.5cm diameter), with star-shaped or irregularly shaped pieces, and with food that has a high oil coating -- those pieces clump together in the hopper. If your current kibble is large, test with a handful first. If it jams, either switch to a smaller-sized kibble variety of the same food, or break up the larger pieces before loading.
Run the test while your pet is in the room so they can see and hear the dispense cycle. Some cats and dogs are initially nervous about the motor noise. If your pet backs away or refuses to approach, do not force them to eat from it immediately. Let them investigate at their own pace for a day or two. You can put a few pieces of high-value treats near the bowl to create a positive association. Once your pet is comfortable approaching, switch to loading the full kibble supply. I use a slow kibble transition anyway -- I mixed 25% of the new feeder's output with the hand-measured amount for the first week while Biscuit got used to the new routine.
After the live first meal, check the bowl to confirm the correct amount dispensed. Weigh the food in the bowl and compare to what you programmed. If it is significantly over or under, adjust the portion setting and run another test dispense. The VOLUAS holds its settings through power cycles as long as the batteries are in place, so once you dial in the right setting it will stay put.
What Else Helps Once the Feeder Is Running
A feeder handles the schedule, but a few other habits make the whole system more reliable. Clean the bowl and chute weekly. Dry kibble leaves an oily residue that builds up inside the dispense chute and on the bowl surface. If you skip cleaning for more than two weeks, you will start getting partial jams where the auger catches and dispenses an inconsistent amount. The VOLUAS bowl and hopper lid both detach easily -- everything except the motor base is hand-washable. I do a quick wash every Sunday and have not had a jam in six months.
Check the battery backup every month. D-cell batteries last a long time, but you want to know they have charge before a power outage tests them. I set a recurring phone reminder on the first of each month to pull the batteries out and check voltage with a basic tester. If they read below 1.4V per cell, swap them out. Do not wait until they are completely dead. The feeder will lose its programming if both USB power and battery power fail at the same time.
If you are going away for more than three or four days, fill the hopper fully before you leave and confirm the schedule one more time. The 4L tank on the VOLUAS holds about 2.5 to 3 pounds of standard dry kibble depending on kibble size. For two cats eating 60 grams a day combined, that is roughly 20-25 days of food. For a 30-pound dog eating 150 grams a day, it is about 9 days. Know your animal's daily consumption before a trip so you are not guessing on capacity.
Set the clock right, weigh the portions once, and record a voice message your pet already knows -- that is the whole setup. Everything after that is just cleaning it every week.
One thing worth knowing before you commit: automatic feeders work best with dry food. They are not designed for wet food, raw food, or anything with high moisture content. If your pet is on a wet-food-only diet for health reasons, an automatic feeder is the wrong tool entirely. If your pet eats mostly dry with a wet topper, feed the dry through the feeder on schedule and add the wet topper by hand when you are home. That is what I do for Mochi's evening meal. The feeder handles the dry portion at 6 PM while I am still at work; I add a spoonful of pate when I get home.
Finally, do not expect your pet's behavior to change overnight. The feeder is consistent, but pets need a week or two to trust the new routine. You may get some extra meowing, some pawing at the feeder between meals, or some early morning patrol in front of it. Hold the line. Do not supplement with extra hand-fed meals during the transition or you will teach your pet that meowing eventually produces food from you anyway. Stay consistent for 10-14 days and most cats and dogs figure out the new schedule on their own.
Ready to get off the 5:45 AM feeding schedule? The VOLUAS is the feeder I recommend.
4-liter hopper, four programmable meals, 10-second voice recorder, dual USB and battery power, and a straightforward button layout that does not require an app. Over 12,000 reviews and rated 4.4 stars. Works for cats and dogs up to medium-breed size.
Amazon Check Today's Price on Amazon →